1989 VW WESTFALIA GoWesty 2.3 REFERENCES, GoWesty, Europro of Costa Mesa & PARTS SOURCES
My VW Westfalia / GoWesty Blog
Last
2/20/2013
|
1989 VW WESTFALIA GoWesty 2300 CC email: b . bill . p (at) gmail . com (spam control, fix appropriate format)
|
|||||||||||||||||||||||
|
Our Westfalia is used for weekend fun runs and has been driven just 10,000 miles since 2003. It was purchased in 1992 with 11,000 miles on the odometer, currently 104,000.
I decided to upgrade my Westfalia so I'll document what I'm doing by creating a blog. The first reason behind this is the water leak these VW products suffer from. Second, these are heavy machines weighing in at 4,460 pounds with a 1/2 tank of gas, one medium passenger and about 100 pounds of personal items inside, pretty average load. The first thing out of the scale operators mouth was "wow, that's heavy!".
The decision to move ahead with a GOWESTY engine is simple, it is a replacement and not a large irreversible modification even though its hard to ignore the Subaru engine. I choose to install the somewhat modified 2300 CC engine for a gain of 10 percent horsepower and 25% torque to push this heavy van down the highway. The following is my log.
Maintenance Items
Current and Future Projects:
ACTIVITY Log
2002 Replaced the radiator and the long radiator pipes; all rubber parts front and rear including around the gas tank. removed and cleaned all grounds
2/2003 Tune up, OXS sensor, batterY.
2/2003 Tires and brakes
2/2006 New engine cooling thermostat and general checkup
4/4/2006 If I'm not going to get a new BMW M3 or X3 and there are no other mini vans that come close to the Westy, then let's order a GoWesty 2300 CC engine instead of trying to fix the leaking head gasket. The engine swap is about the same cost as a lease startup with cash and deposits plus license fees. The Vdub engine is in otherwise perfect condition and runs great but the water leak is not going away and will only get worse in time.
A GoWesty base engine PLUS the 2300 CC upgrade is on order. Initial cost includes a $1,000 engine core charge but additional replacement parts in the engine area will be required to complete a reliable installation. That would include rubber hoses, fan belts and muffler parts.
A set of 16 inch Mercedes type mag wheels will be installed during the engine installation as well as all rubber parts and hoses. No other problems are expected. The original wait time for the custom built engine is 8 weeks but the last word from Chris at order time is 4 to 6 weeks. So far, the ordering experience has been excellent and I was given a number of options to get my engine to the home of GoWesty, Los Osos California, some 5 hours north of Orange County California.
5/11/2006 Contacted GoWesty for shipping information to truck the Westy up to Los Osos. They recommended Me and Molly McGee Trucking who worked around my complicated schedule to truck the Vdub to Los Osos.
5/30/2006 Contacted Chris at GoWesty to verify delivery. GoWesty already had the engine out and a short list of extra engine compartment items that needed replacement for lasting reliability. Fortunately regular maintenance has paid off and the list was short and very reasonable. No sense in going through all of this work to drive away with some old cruddy part waiting to break on a long stretch of old road.
All is well and since I was charged for the 16 x 7.5 inch Mercedes style mag wheels, I assume they will be installed. These wheels are hard to get as I've tried many times to order a set by phone. I'm looking forward to the great handling wider tires give and especially to replace the skinny weenies currently mounted.
6/6/2006 We drove up from Orange County to Los Osos, 245 miles to pick up the van from GoWesty. It was a long drive but our GPS took us right to their door step without a single problem. It sure was exciting to round the corner in the small town of Los Osos and see my van in the GoWesty parking lot. Wow, the big 16 inch mag wheels look great and they are definitely larger than stock, 7.5 inches wide. I was anxious to try out the new 2.3 liter engine and also to return the rental car so there would not be another days rental charge. After settling out the paper work and reviewing the 48 month warrantee I drove the VW around the block and instantly realized the changes. After filling the tank with 89 octane gas, $3.55 per gallon, my wife drove the VW to the airport behind me. After arriving she walked around the VW, checked out the big wheels and told me how well it handled. Well, I never did tell her how much all this cost but I had planned on selling my wonderful BMW since I no longer need two cars for myself.
To make a long story short, the 285 miles home was a delight, my wife drove the first 145 miles to Santa Barbara during which time she got to use and feel the improved handling and the power from the 2.3 engine on the hills. Overall, she is very impressed with the changes, excellent handling and very good power. For once, we didn't have to anticipate hills and speed in advance.
One more note about the 16" tires. The ride is excellent, very firm making the van stable in the cross winds and while passing large trucks. At first I was afraid the tires would be too stiff and ride as if on rocks but the exact is true, it rides firm like the BMW but not bumping on the rough spots. This change is really worth the money.
So far, so good. The engine starts instantly, idles smooth and otherwise runs excellent. I'm really impressed. The warrantee spells out all the terms for the first 12 and 48 months of coverage and includes a chart for the break-in period and maximum speed limits. The correct tire pressure setting is the only missing information.
6/8/2006 This is the first day I've had to just putter around SoCal to get the feel of the improved performance and what better to do than drive 40 miles south for breakfast in San Clemente. The route includes driving over the top of the toll road past the microwave towers then down and up and around to connect to the south bound 405 freeway. Once in San Clemente we drove around the old town and through the beautiful homes lining the beach cliffs. By the time we got home I had nothing but praise for the decision to get this 2300 CC engine and the big 16" tires. This combination really changes the drivability of the VW. It powers up the freeway onramps and especially up the toll road past the towers. Where it previously was a challenge to maintain 3,000 RPM, I could easily do 3,500 RPM without holding the pedal to the floor, lesser hills were no longer a challenge, the new found horse power and torque really made a difference. What is hard to describe is the total drivability of the VW, it feels more 'modern'. I really recommend this combination of tires and engine as a minimum.
August 9, 2006: At 1100 miles now and I have to say that I'm really pleased with everything. The engine starts and idles smooth and really shines in second gear as I power away from the signal lights. This van has an Auto Transmission and it really does perform well on the streets and busy southern California freeways. I can power up the big climb out of Ventura south and on the two local hills like never before. RPMs about 300-500 higher in top gear in relation to the old engine. Nice but if I did a lot of camping in the mountains instead of the flat sea shore, I would be very tempted to take another $895 plunge and go for the 2.4 engine.
In all cases, the big 16" GoWesty wheels are wonderful, the 18 wheelers and coastal wind do not cause the Westy to jump a lane, in fact, it steers like my rock solid BMW 325.
By the way, all the power is in the mid range and it seem useless to rev the engine in any gear. Most of my driving is around town and the engine RPM is in the 2,500 to 3,200 range. Just cruising .... MPG ranges from 16 around town to 19 on the freeway but this is far to early for final MPG figures with a new engine.
August 10, 2006: Every trying to improve mileage, I installed a new K and N Engine Air Filter and noticed a very nice performance improvement from the moment I started the engine and throughout the day as I ran errands. The weather is the same as its been all week so that variable is out of the question. This was a good upgrade. See www.knfilters.com on the web or at Pep Boys Automotive. The part number is E2475.
There is a new auto parts place called the Automobile Box, chalk full of auto goodies for street racers but many accessories are good for the Vdub too.
10/30/2006 Everything is running fine and now the engine is beginning to loosen up with around 1900 miles on it. Overall gas mileage is 16 MPG and 19 MPG on the freeway. I'm still a very happy camper and have ordered the GoWesty High Power Headlight Kit as the next step in the project.
Regarding interior lighting for the driver/passenger cabin, it seems the 2006 Audi A4 has gray cabin lights that are not too complicated. The Audi rear seat dome light would look great in the VW cabin and the Audi front door safety lights would look great on the VW doors too.
Waxing the Fiberglass top is a PAIN. Use 3M Marine Fiberglass Restorer and then follow with 3M Fiberglass wax. Expensive products but they work!! Apply the polish and wax with a power orbital buffer for super results then follow with a six pack and pizza, its a full days job.
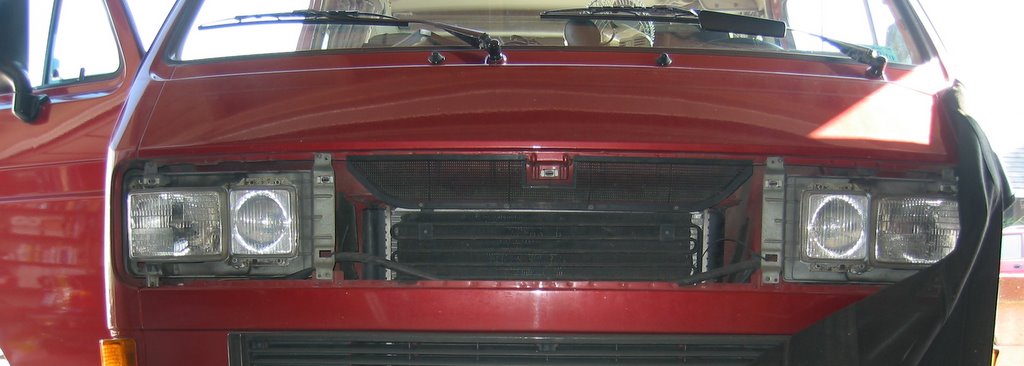
GOWESTY HEAD LAMP UPGRADE
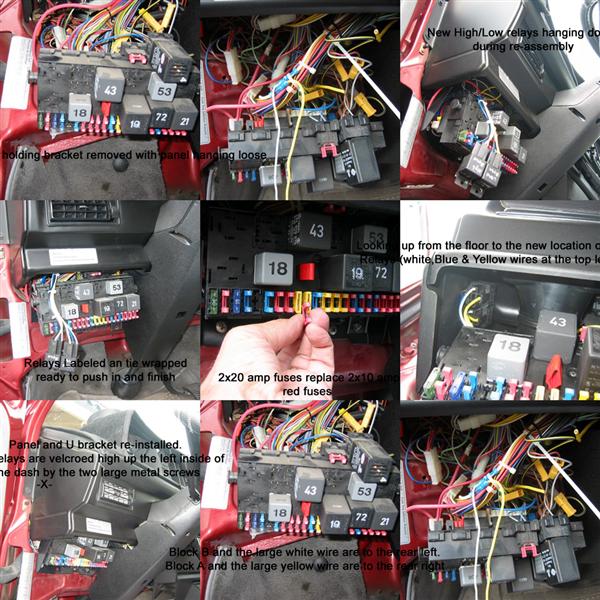
Installing the GOWESTY Relay and Bulb Upgrade for the 86-91 Vanagons/Westys with Standard Grill.
I did the electrical part first because you must not install the bulbs then use the unmodified electrics. Do not begin unless you have a very good wire trimming tool for #12 wire and a good electric connector crimper. I bought a crimper from OSH Hardware. Make sure the quality of the crimper jaws are straight and not overlapping cause apparently quality is very poor.
Read the directions twice. The top of page 2 identifies which of the new relays is for Low Beam and High Beam. Mark the top so there are no errors.
Disconnect the car battery negative terminal and put something under it to prevent it from touching the battery. Remove the fuse box cover and remove three screws at the bottom of the fuse/relay box as it must come out a few inches.
Follow the directions. The Yellow wire at A21 is the only heavy yellow wire on the backside of the panel. Same for the white wire at B22. I used lots of 10 inch cable ties to keep everything neat. The hard part was getting the crimp tool into the tight spots to crimp each of the two barrel connectors from the original wiring to the new White or Yellow wires. The remaining connections are very easy to make to the STAR ground to the left of the panel and to the power buss on the left rear of the panel. That was the easy part.
When finished, bundle the wires to the new relay to keep them nice and pretty and away from tangles or friction. Mount the two relays high up the inner left wall of the dash board. I cleaned the metal surface with alcohol before 'sticking' the Velcro onto the metal to make a long lasting connection.
Double check everything before screwing the panel back together. Test by attaching the battery and make sure every light works because this is the easiest time to fix a bad connection.
Pushing the fuse/relay panel back into place some careful work. Don't let any wires become pinched behind the brackets. Review the instructions before bolting everything together. Don't forget the final step to swap the 10 amp fuses for 20 amp fuses.
The electrical is now finished. This part of the project took about 2 hours to complete. Later the headlight lenses will be removed, washed out, the new bulbs inserted then everything re-assembled. Since I had some rock damage a new lense was purchased for $145.00.
HEAD LAMP Part II
To prevent stuck or broken head light adjusters, spray each adjuster days in advance with silicon spray. I did mine twice otherwise be prepared to replace one or more.
Replace headlight lens: Pop the nylon adjuster out of the HEADLIGHT, not the headlamp carrier frame. Surprisingly the adjustment remained very close after replacement.
A note about the headlight adjusters: Buy and keep a set on hand because these do break during adjustments.
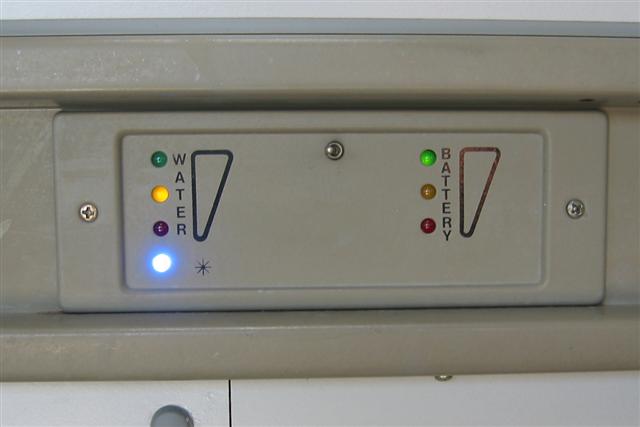
Interior Front Cabin Light Update Two extra VW style light assemblies were ordered to install at the center and over the passenger position. Helpful but at least the interior remains original.
4/2007 Replaced the old and seeping differential and ATF gaskets. The Auto Transmission cooling pipe connections to the transmission need new O-rings and the bottom needs cleaning. Where do I find someplace to do this?
5/2007 Installed
Sylvania DOT-IT LED lamps over the bed and
couch. Installed
Marine Quality 12V accessory sockets to power personal accessories,
IPODS, charge cell phones, Ham Radio, or extra lights.
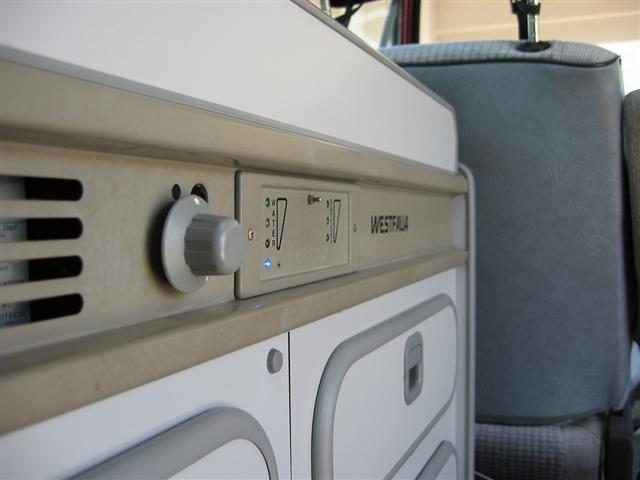
5/2007 Maybe hard to see but the 12 volt accessory sockets are the black dots in the center of the photos. Each was positioned for easy access and non interference to the passenger or to the area behind the socket. The circuit to each socket includes a 10 amp fuse and power comes off the refrigerator circuit. Care should be taken when using the accessories and the refrigerator in electric mode at the same time. The backside of each socket is protected by a pill box cap to prevent accidental shorts.
5/2007 Replaced the dim green Dometic Fridge pilot light with a bright BLUE LED from Radio Shack part number 276-316. This is a direct replacement even though the operating voltage of the Blue LED is higher, the brilliant display with the original resistor network and LM342 driver is more than adequate, maybe too bright.
Here is the big advantage of this brighter LED when lighting the frig gas pilot, the LED light is visible during the daylight hours so staring down the little pilot light hole is no longer necessary. It's also visible while laying in bed or through the front window. Really enhances lighting the fridge cause the LED lights up within a second or two of the pilot light, just 'spark' slowly to give it the extra second of time.
6/2/2007 We went to the local custom VW showing at Octavios Custom Upholstery in the City of Orange. Something for the future but next door is an Auto Electronics store, Alpine radios and video backup cameras; Jerry's VW Restoring. 1441 Colins, Orange, CA.
10/2007 Participated with the American Red Cross at the Santiago fire shelters and for the California State Office of Emergency Services. Saw a need for improved interior lighting. Since this was an item on my list, I skipped other projects to add brighter interior lights.
12/2007 Replaced the 5 watt Festoon lamp over the driver with Luxer 1 , 6-LED array for brighter interior light. Preparing to install the same module over the passenger. Replaced the 3 watt Festoon lamp in the light fixture above the glove box. Installed Dot-It LED Lights between the front sun visors. The interior is now bright and white for night time map reading and emergency services operations. More to come for the exterior. Battery operation of LED lighting is possible because LEDs use so little power and Lithium batteries have a long life rating.
1/1/2008 Replaced the radio antenna with a black whip from PEP Boys. Finding 3/16 long 10/32 set screws to fasten the antenna took an entire afternoon.
Looks like I didn't do much in 2008 except work on the LED lights and Aux DC wiring. The transmission was cleaned with engine Gunk Spray to help locate the very slow oil leaks.
3/2/2009 Took my Westy to Joe Schoeningh at Europro to find and fix the source of the slow oil leaks and discuss upgrades to the brakes. Joe gave me an honest assesment about my brakes and said there were fine for the type of driving I am doing, that is with a lite load to and from the beach or out to some small hill top parks.
Joe checked my transmission for leaks and saved me a lot of expense when he pointed out that the axle seals did not need replacing. He pointed out the location of the leak at the transmission front motor mount where the trans cooler tubes are attached; the O-Seal over a round trans cover and anther seal that has to do with the 2nd gear brake band. Changing the last seal required going inside the transmission. Joe also recommended an external auto trans oil cooler for reliability. The stock cooler exchanges heat by passing the transmission oil through a heat exchanger where engine coolant circulates. It was pointed out that if the stock cooler goes bad water can get into the transmission and transmission fluid can get into the engine cooling system ..... $$$$. The new external cooler is less expensive than a VW cooler. Check GoWesty for pricing.
Europro of Costa Mesa California 1-949-642-3872
End of the day, no drips in the driveway ..... Lets hope this success continues .
Next big item is a Rostra Cruise Control mentioned earlier ..... not VW components. http://www.rostra.com/cruise-control.htm
3/12/2009 Ordered BRIGHT tail lamps and front parking lamps from Terry K [CTONLINE@webtv.net] at http://community-2.webtv.net/VanStuff/VanagonWestfalia/ Terry has some very unique replacement parts on his site. Another project finished.
WOW! This is a very worth while upgrade, you'll know that the folks behind you will see your tail end. The Tail lights were too bright but I was able to find lights with wattage one step up from the originals.
10/9/2009 Installed a Bosch rebuilt Alternator from GoWesty at 107,000 miles. The alternator looks brand new and comes with new regulator and components. Local shops do not rebuilt like this since the last Alternator lasted about 10,000 miles. Changing it out was a real struggle as the lower bracket bolt is a bear to insert but after lots of struggling, I was able to get both hands around the bottom of the Alternator to push the long lower mounting screw in.
NO TRANSMISSION LEAKS to date
11/30/2009 Today I learned that some of the service items for the smog system have been obsoleted by VW. Maybe in a slight panic I ordered a spare Emissions Charcoal Filter.
11/30/2009 Pat from Torrance has been asking about my development for a really cool camper light. Well I've actually got a very powerful LED lamp working but I have not selected a suiteable RV lamp housing to put my circuits into. This lamp has 4 levels of intensity and draws far less power than a incandescent lamp, its really nice.
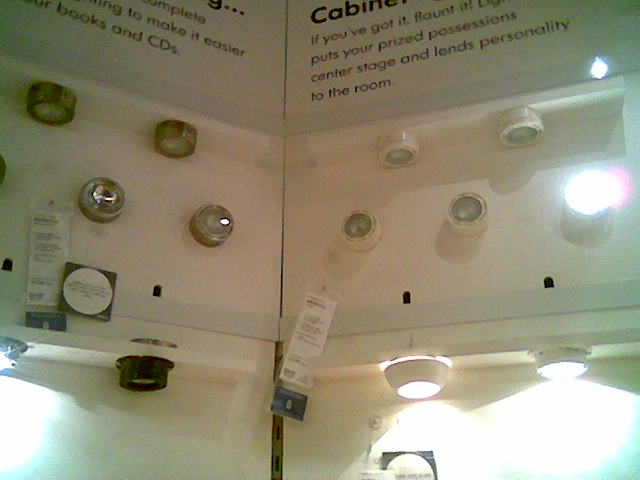
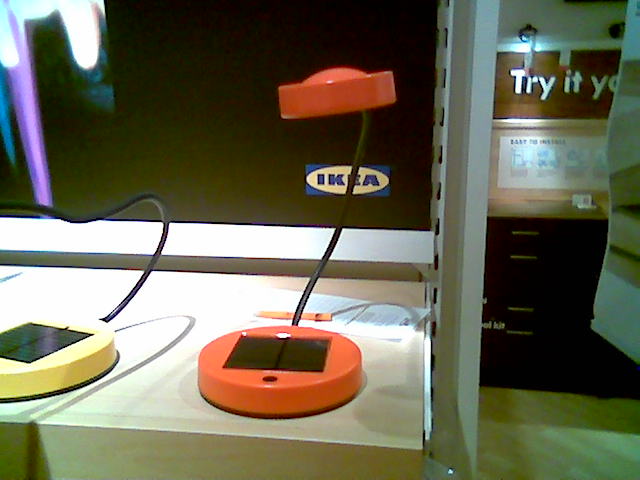
Today I went to IKEA to find a light to modify with my circuits and found all of these styles. The choice is certainly going to be difficult so I'll post the styles here. Also, IKEA has a very good selection of 115VAC powered LED lights, check out the power plug with the built in 115VAC to 3.6V DC power supply. I sure like the string of LED lamps mounted under the cabinet in the following photo. These would be a nice when mounted above the Stove Top but in reality non of the IKEA LED lamps are good for main lighting, I think these are for mood lighting or decoration. Whats missing are the very high power CREE emitters that are computer controlled. I'm working on it so check back.
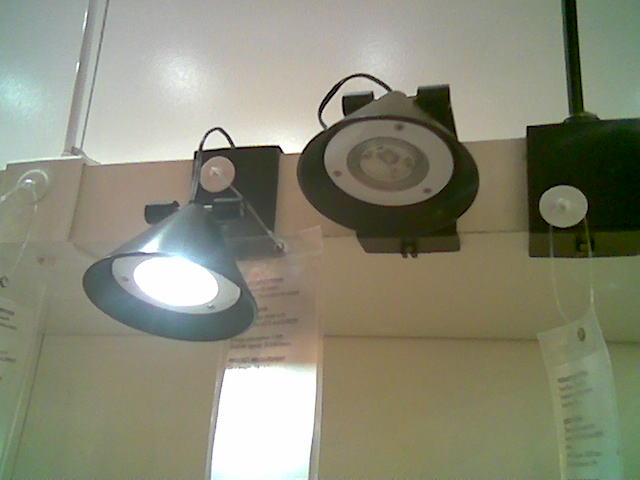
These look like good candidates for a LED conversion but there is no space for the circuit board power regulator
LED Lamps shown here
Colorful Solar Charged LED Lamps
When looking at LED lamps, let the light shine onto a plain piece of paper to compare brightness, color and beam width to other lights before making a choice. The cute Orange Solar Lamp shown really got my attention.
June 24, 2010 The large bolt for the rear view mirror was coming loose, I discovered that by chance and a good thing because it is very difficult to attach once it falls loose. The bolt has 2 notches in it that a 4mm hex wrench will fit into although loose but at least an emergency repair can be completed. A better tool with 4.5mm tangs would be a solution but good luck. Just take care not to pinch the wires to the mirror motors.
Also lubricated doors and locks with garage door lubricant, checked the big Michelin Tires 44R 42F, filled the RV water tank after checking the water faucet for operation. The Dometic 182B Fridge is slow to cool on Gas, I think the GAS JET is partially clogged because I can hardly see it through the glass inspection hole however the LED Pilot Lamp is on bright. Cooling by AC power is fast so there is nothing wrong with the basic fridge.
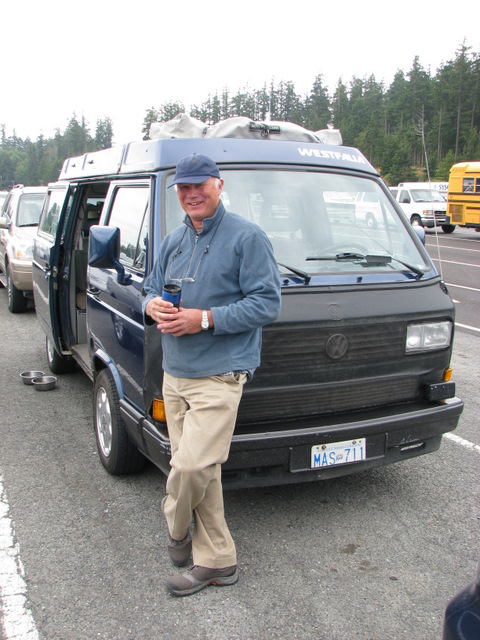
August 2010 We just returned from a super trip around Seattle Washington and to the San Juan Islands, Orcus Island in particular. I guess a lot of Westy drivers are familiar with this area as I saw many throughout the trip. I spoke to David from Canada while waiting in line for the ferry at Anacortes to the islands. He is driving a nice blue 1990 Westy with a TICO engine conversion, big GoWesty tires and the Big Brake kit. Very impressive.
Look for more Washington Westfalias here soon.
Thanks to everyone for the kind responses and photos which I plan to add to this page to share. Only minor changes have been made this winter including a 6 watt variable intensity LED dome light that I plan to make for sale.
11/2/2010 Replaced the Westy Starting Battery. The Sears Diehard International 41 was over 5 years old and the voltage would hardly stay above 12vdc. A new interstate MT41 was installed. The battery measures 7W X 7H X 12L, a very tight fit. A similar battery for the 1994 BMW 325 is about 1/2" smaller and would be my choice in the future. See Interstate.com for the battery product number.
1/2/2011 With all the bad weather nothing is going on here, its just too cold to work in the garage but that doesn't stop creating new ideas. The gas jet on the fridge needs to be cleaned because it is not cooling down very much. Next oil change will be to switch over to Mobile-1.
5/21/2011 I don't know what's in Mobile-1 synthetic oil to make this engine purr but I like the results. MPG varies from 15 to 20 around town or freeway driving.
11/15/2011 Began hearing a weird noise from the front, pulled the front wheels off and found some wear in the wheel bearings. Replaced and also had a complete front brake job performed. Disks, calipers, tire rotation and air filter service. Discussed replacing some of the wear and tear parts to keep the ol VW reliable.
The home made dual CREE LED lamp has been very reliable and I'm thinking about selling prototypes. The lamp draws low power at 12 volts, low heat, adjustable output from very low to full intensity. So far I've not seen anything like it.
Additional LED interior lights in the form of long strips are now available at Pep Boys Automotive. These look great for lighting up under the dash board or anywhere in the cabin.
1/2/2012 For fear that some part kits at Go-Westy may run out of production, kits for the gas tank, fuel line and stainless steel radiator pipes were ordered for future installation. I guess the last brake job cancelled the Audi/Porsche big brake kit as the new brakes are more than adequate.
3/31/2012 Its time to replace the 1990s Radio Shack Cassette Radio with a 2012 Kenwood KDC-BT652U and Helix Esprit E4X speakers. This was not an easy job because each speaker hole had to be enlarge a few millimeters and front adapter rings constructed. If you don't have sufficient wood working tools do your self a favor and let a professional install the radio and speakers. I was trying to maintain the original look by recycling the speaker muffin covers but it turned out the screw holes on the new speakers were just difference enough that this was not possible. Even though the speakers are the same DIN size 4 inch speakers there was a small difference in the mounting hole diameter requirement and interference with the wire terminals that required careful wood work.
While changing the speakers I found a broken cable conduit that runs from the dash board into the door so 10 wires of #18 size were pulled through to aid in the repair of the cable and speaker wires. Silicon and liquid soap wiped onto the wires made pulling an easy job and the same technique made replacing the rubber boot very easy. Wiring the Kenwood connector to the VW connector is aided by removing the ash tray. I highly recommend installing a quality electrical interference choke in the radio power cable to reject electrical noises. The choke aids in removing electrical interference and alternator whine from the audio output.
While the door is open, lubricate the window register slide and moving parts while the door panel is removed. The rubber and foam blocks that guide the window became separated so 3M adhesive was used secure loose parts in place. Lubricate the door cable boots so the boot moves in and out of the door frame recess instead of folding and pinching as the door is closed. This is the area where the wires were broken.
Sound dampening material was placed behind the speaker location and on the inside skin of the door panel to dampen rattles and resonance. Clean everything and carefully remount the clear plastic moisture barrier. I lubricated each door panel pin with silicon to help during re-assembly.
The holes for the rear Helix speakers must be routed about 3 millimeters larger for the speaker magnet to fit and the speaker terminals must be spread flat to the curve of the speaker body so the wires with terminals will fit between the speaker body and the hole inside diameter. A Dremel tool was used to route out the bottom half of the circle to allow for additional terminal and wire clearance. The cut was made into the wood behind the Melmac finish. Trimming a notch into the left speaker cover was necessary for a good fit. This was done by making very small cuts until the fit was satisfactory then the raw ends of the metal were filed and painted to look fresh.
The photos detail the speaker differences and the cut necessary to the Helix speaker mesh cover. Be very careful while working at the front of the speaker to prevent damage. Installing the Kenwood KDC-BT652U involves removing the old radio, popping out the ash tray, soldering the new wire harness for speakers and then soldering the red and yellow wires to a choke then to the 12 volt source with 10 amp fuse. Don't forget to attach the ground wire. Pushing the radio into the dash too some effort to route the wire bundles properly so they did not interfere with the limited space behind the radio. Be aware of sharp metal edges and possible electrical shorts.
The job took about 3 hours or more to install the radio and splice the speaker wires and power wires. The rear speakers took about 4 hours total and the front speakers took about 6 hours. At least half of the time was for measuring clearances and determining mounting methods before drilling and cutting. Because the speaker cones extend past the mounting frame its necessary to mount the speakers on the inside of the front door panels then machine the speaker grill/covers to remove 2 millimeters for clearance to the dash board with the doors closed. A very snug fit.
The Kenwood with Helix speakers are a large improvement over the stock system but lets face it, the VW interior is noisy at speed so someday I might upholster the cabin headliner and door panels with a modern soft material to absorb wind and road noise. Additional sound dampening material should be installed inside the door cavity. The Kenwood KDC-BT652U radio is fantastic, AM/FM, CD, Blue Tooth for Music or Cell Phone, Pandora, USB cable compatibility with the iPhone4 and a front panel mini stereo AUX input for old audio device input. The remote control works very well but it could be larger for easier handling. Pairing Blue Tooth was a hassle for some reason then suddenly it paired by itself, don't ask, could be easier and now it pairs automatically.
Thanks to my friend Dr. Ken Chong and Jaime and Tom at Beach Auto Sound in Huntington Beach for their advice.
May 2012 The original spare tire is very old, its time for a new tire but finding a 185R14 or 195R14 with load rated 'D' is not easy but a call to Van-Cafe solved the problem. Luck would have it they received a fresh shipment of these tires and it only took a few days for one to arrive via UPS. Excellent customer service !
June, 2012 The A/C no longer turns on but the fresh air fan works so the primary fuses are good, it could be another fuse or the A/C on/off or speed switch but trouble shooting in the dash is not easy. The Bentley manual indicates fuses located in the front left of the dash and in the pillar next to the engine, the D pillar. Anyway it would be so simple to check for power at the on/off switch but it seems the glove box must be removed to reach the back side of the switches.
February 2013 How the time has flashed by, various projects have kept me busy but here is the news: after having some work done behind the fuse box the radiator fan stopped working and it took many hours to find a wire that had been knocked loose. Determining the correct connection behind the fuse box took another number of days to solve, this is not an easy place to work, the wiring is more or less not friendly. At last the correct connections were found and everything is fine.
How many of you have checked the condition of your spare tire ? I bet its been 10 years or more since that tire has been removed and checked. Well I pulled my spare out and it did not take long to find that it would not perform, the rubber was very dry and I was told the tire would desintegrate after a few miles. I'll spare the details but a call to Van Cafe resulted in a brand new tire of the correct size and load rating. I highly recommend everyone check the spare as soon as possible.
More spare parts have been purchased from GoWesty but my wish list on their site grows faster. Is GoWesty reading my page here? I find some of their products are items that I've mentioned and wanted such as improved LED lighting. Wow, they had a 5 speed tranny but the price is way past my means.
6/2/2013 The GoWesty 3rd Tail Light was installed today. Pulling the wire from the area of the 3rd brake light to the drivers side tail light assembly was made easier by running #18 red/black zip wire first. The wire is stiff which made it a little easier to drop the wire down the inside wall behind the cabinet. The cabinet looks messy to remove so with a little probing the zip cord found the path out to the floor of the metal shelf. Instead of running the wire thru the grommet for the electric cable into the engine compartment, I found it easier to route it through the grommet for the AC hose then to the lamp assembly. It was much easier to ground the black wire behind the tail light. Because I didn't remove the cabinets to drop the wires I changed how the ground side is installed, a #10 sheet metal screw was added directly behind the lamp assembly. At the top, the stop light wires were joined to the zip cord with bullet connectors then the wires were secured to the AC hoses with small tie wraps.
The finished results look great, the GoWesty 3rd Tail light is big and bright, because it is an LED array it should never fail.
2014 Its been a while since I've updated my pages so the only project that comes to mind is the installation of the very nice GoWesty interior LEDs, addition of a heat/light/motion sensitive LED lamp that has been mounted at the bottom center of the rear seat. A full kit of GoWesty cooling system parts was installed, that is every item that radiator coolant flows thru excelpt for the long pipes to the radiator. A full kit of GoWesty fuel part was installed around the engine to replace original plastic parts, hoses and fittings up to the fuel filter. MAXED Auto in Huntington Beach performed all the above work.
2015 This 1989 Westy Failed the California Emissions test, the NO output was about 5% over the limit and after researching the NO output from previous emissions tests it became obvious the NO output was sneaking up so the recommended repair, installing a new GoWesty Catalytic Converter was performed.
Dometic 182B refrigerator rejuvination. We have not camped in the VW in years so it was no surprise recently when I wanted to use the frig to keep our picnic drinks cool during a long drive. No matter which setting on 12 volts, 115VAC or Propane the temperature was anything but cold so when I heard a rumor that turning the frig on its sides, front and back would somehow loosen the refrigerant I had to try it. Yes it does work, I was in no hurry so I let the frig sit on wood blocks for weeks at a time before rotating it to a different position. After setting it up on a test bench and using 115VAC the ice tray measured 35 degrees F in 2 hours so I lit up the propane and measured 42 F in a few hours, this was with a trash bag covering the front as the door comes off when the frig is removed from the VW. The propane hook up used a Coleman bottle of gas and an adapter hose. While the frig was out a GoWesty fan was installed to enhance cooling. However I could not restart the propane no matter what routine I followed. I noticed the air pump was worn and the design is terrible, an intake valve is not in the design and neither are proper seals on the pump shaft. I have some ideas for an alternate pump and automatic sparker to try in the future.
A BMW X3 Turbo SUV is now parked next to the Westy but its not hard to decide which machine to drive down Orange Counties Pacific Coast Highway on Saturday and Sunday, VroomVroom go the fancy Porsches and Ferraris however this old Westy is as much a conversation piece as any and we continue to enjoy having visitors come over to share adventures.
Keep the letters and photos coming, its been fun meeting so many Westy owners and I have guest photos to post .
Hope to see you around the OC, that's it for now .... Bill April, 2015
********************** Like to hear form other Westy owners, send your Feed Back to Bill at b . bill . p (at) g m a i l . c o m spam control, remove spaces and fix the symbol |
|||||||||||||||||||||||
|
VW Westfalia Parts Sources
Europro of Costa Mesa, California 1-949-642-3872 Transmission Leak Repairs, Engine Repairs & Upgrades, Restorations. Subaru Engine swaps, Big Brakes
GoWesty Camper Products 888 469-3789 www.gowesty.com Great Service, Excellent 2.3 WBX
Van Cafe VW Parts & Accessories http://www.van-cafe.com/ Big Brakes, mufflers, brackets and more
http://community-2.webtv.net/VanagonUsedParts/VanagonParts/
Rare parts, Lamps, Transmissions, Mufflers
and Many Misc Parts Terry Kay 621 Larkdale Ln. Mt.Prospect,IL. 60056
"broke down, or need a part yesterday " 847-924-9849
I found Terry to be very helpful with very unique information and
ideas to keep our Chariots in good order.
West Coast Metrics 310 325-0005 www.westcoastmetric.com Parts
Bus Boys 530-244-1616
West Marine www.westmarine.com Marine Quality Accessories VW Service Bulletins: http://www.vanagonparts.com/tech_bulletins.html#032 SERVICE NOTES: Alternator noises
The first Alternator bearing replacement was around 45,000 miles and now a complete rebuild at 95,000 miles. Installing the alternator bottom bolt alternator is difficult but it can be done by jamming your hand around the fuel injection pipes to push the bolt through the yoke.
CHUGGING WITH BLACK SMOKE, 1995:
The fuel regulator stuck intermittently causing an over rich fuel condition. It was not easy to diagnose but finally the device was changed. The fuel regulator is on top of the engine near the ignition distributor. It is a round device with fuel line in and out plus a vacuum line. Cost $70 USD.
Possible resolve is to remove and clean all electrical grounds around the engine compartment.
CHUGGING WITH BLACK SMOKE, 2003:
Thinking it was a repeat of the above, but the problem continued to occur after replacement. Each major component in the engine compartment was temporarily replaced including the ECC or ECS. Finally it was decided that the OXS sensor wire was shorting to ground. Following replacement, the van continues to run fine. Note that the smog computer or ECC of this vintage does not have an output to a diagnostic computer. This makes old fashion trouble shooting necessary. Cost USD about 400 dollars.
OTHER: Check the IDLE switch for proper operation or replace the switch and nylon cam then adjust; check/change the charcoal canister if the milage is over 100,000; Replace the BLUE temperature sensor on the drivers side cylinder head; clean each frame ground under, around and over the engine. Cleaning the grounds has solved many problems. There is another large ground block under the dash and behind the fuse block very close to the door seal.
Possible resolve is to remove and clean all electrical grounds around the engine compartment.
UPDATE on chugging, Its the variable resistor on the side of the air box. Make sure this is clean and perfectly adjusted.
Replacing the Pop Top Rubber Seals
Pop Top:
Tools: Light sand paper, heavy razor blade, sealer ...... , large flat blade screw driver, MM socket for the front luggage carrier.
Read the package instructions a few times. Only the last paragraph talks about the long seal on the pop top.
Partially open the top and support it open with something soft, a card board shipping box. Carefully inspect the old seal at each front corner because you will want to create the same overlaps. Remove the old seal and clean the old surface with light sand paper. Remove all the crude. The new seal is about 12 inches longer than necessary. Pay attention to the rear corners, when you get there, make sure the rubber seal is truly seated in the fiberglass. I used a glue ..... and applied it at the very edge of the top.
Front Top:
Read the package instructions a few times. The first paragraphs are about the 6 foot seal across the top of the front of the pop top. Remove the 4 bolts from the rear side of the top. Additionally, the screws on each side and the front. Have a helper lift the top onto the work area.
Clean the paint and remove the dead bugs. I waxed this are to protect it for the next 5 years.
Tires:
Tires became a pain when Michelin stopped making the large 205R70 tires mounted on this van when new. After two changes and 10 years the tires are no longer available. GoWesty solved the tire problem by making available the larger 15" and 16" wheel and tire sets which give excellent driving performance.
Waxing:
Waxing the Fiberglass top is a PAIN. Use 3M Marine Fiberglass Restorer and then follow with 3M Fiberglass wax. Apply the polish and wax with a power orbital buffer for super results.
|
|||||||||||||||||||||||
.jpg)
.jpg)
.jpg)